Understanding how to write a well-structured post is the foundation of effective content creation, whether you're publishing blog articles, social media updates, or email newsletters. Post structure isn't just about aesthetics; it directly affects how long readers stay on your page, how well search engines index your content, and whether your audience takes action.
Yet many creators skip structural planning entirely, jumping straight into drafting without a blueprint. The result is often rambling content that loses readers within the first few scrolls. If you've been struggling with engagement metrics or finding that your drafts feel scattered, the fix is almost always structural.
This guide walks you through the exact steps to build posts that hold attention, communicate clearly, and perform well across platforms. These post structure basics apply whether you're writing a 2,000-word blog article or a 280-character social media update. If you're already exploring AI-powered post draft generation, strong structural fundamentals will make every tool you use more effective.
Key Takeaways
- Every post needs a hook, body, and clear call to action to hold reader attention.
- Scannable formatting with headers and short paragraphs increases time on page significantly.
- Matching your post structure to the platform determines whether audiences actually engage.
- Outlining before drafting cuts revision time by up to 50 percent for most writers.
- Consistent structural templates let you produce quality content faster without sacrificing depth.
Step 1: Understand the Core Components of Any Post
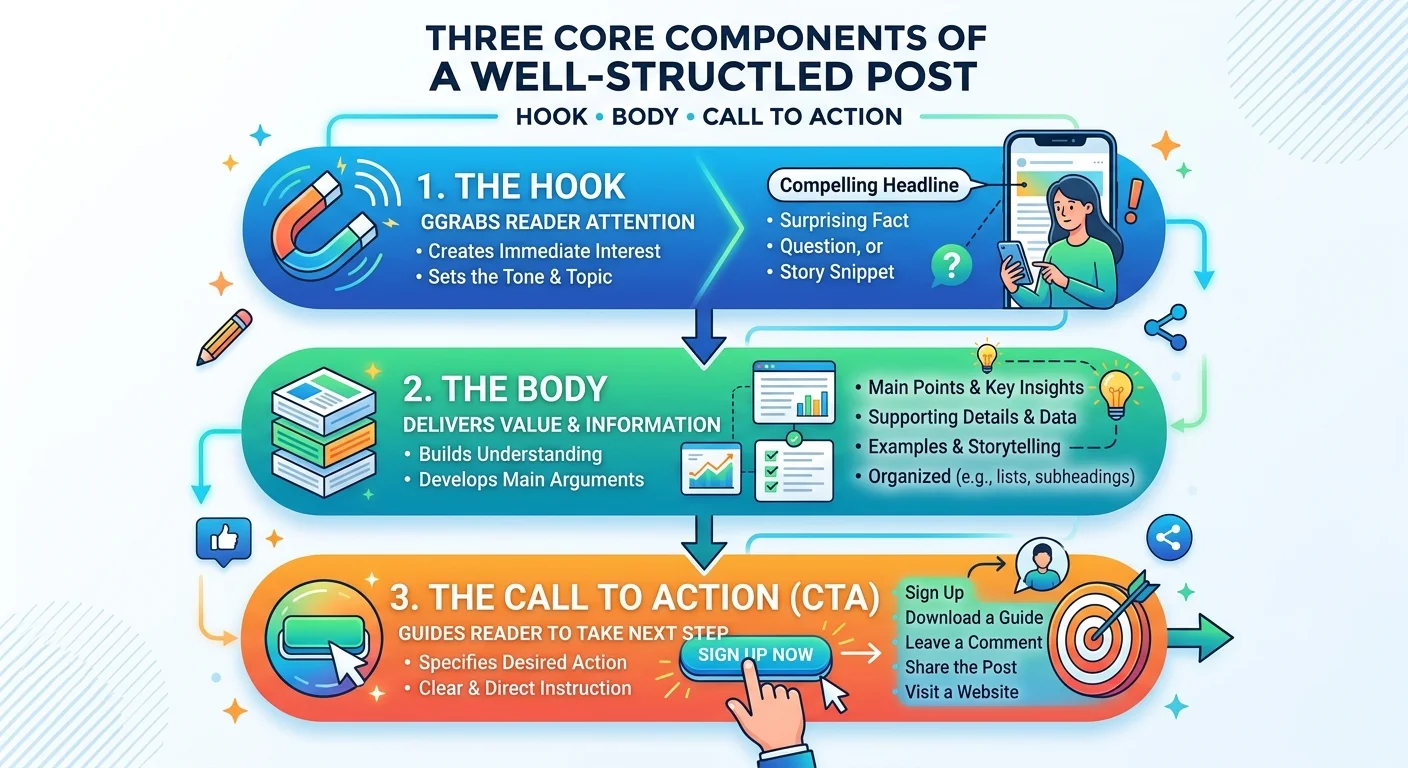
The Hook and Introduction
Every piece of content, from a LinkedIn update to a 3,000-word tutorial, shares the same foundational architecture. The opening hook is where most creators fail. You have roughly 3 seconds on social media and about 10 seconds on a blog before a reader decides to stay or leave. Your hook needs to present a specific problem, a surprising fact, or a bold claim that creates enough curiosity to justify continued reading. Generic openings like "In today's digital world" tell the reader nothing and waste their limited attention.
The introduction that follows the hook should accomplish three things. First, it establishes who the content is for. Second, it previews what the reader will gain. Third, it sets the tone for the rest of the piece. Think of it as a contract with your reader. When you explore blog drafting tips for better content structure, you'll notice that strong introductions consistently follow this pattern regardless of niche or topic.
Write your introduction last. Once you've drafted the full body, you'll know exactly what to promise your reader upfront.
Body and Supporting Content
The body carries the substance of your post. Each section or paragraph should make one clear point, support it with evidence or examples, and transition logically to the next idea. A common mistake is trying to pack multiple arguments into a single paragraph. This overwhelms readers and makes your writing feel dense. Instead, treat each paragraph as a self-contained unit with a single purpose.
Your closing section, whether it's a formal conclusion or a final sentence, needs a clear call to action. Tell readers what to do next: comment, share, subscribe, or apply a specific technique. Posts that trail off without direction leave value on the table. According to HubSpot research, posts with explicit CTAs generate 121 percent more conversions than those without one.
Step 2: Choose the Right Structure for Your Platform
Blog Post Structures
Not all content lives in the same environment, and your post structure needs to match the platform where it will appear. Blog posts benefit from longer, more detailed structures with multiple sections, subheadings, and supporting media. The most common blog formats are how-to guides, listicles, comparison posts, and opinion pieces. Each has its own internal logic. A how-to guide follows sequential steps, while a listicle organizes parallel ideas without a strict order of operations.
Choosing the wrong format for your content type creates friction. If you're explaining a process, a listicle format confuses readers who need to follow steps in sequence. If you're surveying a broad topic, a rigid step-by-step format feels forced. Match the format to the information architecture of your topic. Many content creation tips focus on writing quality, but format selection is equally important and often overlooked. You can explore more about content creation tips to streamline your workflow for deeper guidance on this decision.
Social Media Post Structures
Social media writing demands a compressed version of the same principles. On Twitter/X, your entire post might be the hook. On LinkedIn, the first two lines must earn the "see more" click. Instagram captions follow a pattern of hook, story, takeaway, and CTA, all within about 150 words for optimal engagement. Understanding these platform-specific structures is what separates posts that get scrolled past from posts that spark conversation. For practical strategies on this front, the guide on social media writing that crafts posts which convert covers platform-specific frameworks in detail.
The table below breaks down optimal post structures by platform, giving you a quick reference for your next piece of content. These word counts and section recommendations reflect what currently performs best based on platform algorithm preferences and audience behavior patterns in 2024.
| Platform | Ideal Length | Key Structural Element | CTA Placement |
|---|---|---|---|
| Blog (WordPress/Medium) | 1,200 to 2,000 words | H2/H3 subheadings every 250 to 300 words | End of post and mid-article |
| 150 to 300 words | Strong first line (hook before "see more") | Final line of post | |
| Twitter/X | 70 to 100 words (thread) | First tweet is the hook; each tweet is one idea | Final tweet in thread |
| Instagram Caption | 125 to 200 words | Line breaks for visual spacing | Before hashtags |
| Newsletter | 500 to 800 words | Bold summary at top; scannable sections | One primary CTA above the fold |
Step 3: Build Your Outline Before You Start Drafting
The Three-Layer Outline Method
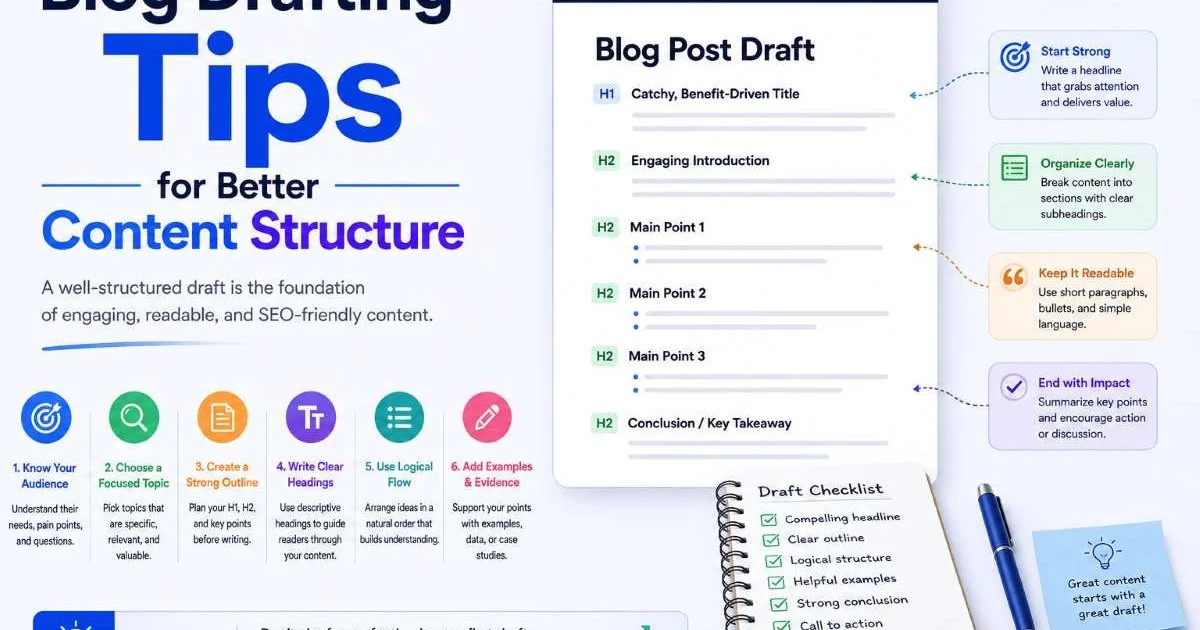
Professional writers rarely start with a blank page and improvise. Outlining is the step that separates efficient creators from those stuck in endless revision cycles. A solid outline acts as a structural skeleton: it tells you what each section needs to accomplish before you write a single sentence. The three-layer outline method works well for most content types. Layer one is your main sections (the H2 headings). Layer two is the key points within each section. Layer three is the specific evidence, examples, or data that support each point.
For a typical blog post, spend 10 to 15 minutes on your outline. Write each H2 heading as a complete sentence that states the section's argument. Under each, jot three to four bullet points covering what you'll discuss. This prevents the common problem of sections that overlap or repeat each other. When you can see the full architecture at a glance, gaps and redundancies become obvious. Tools that help you write post drafts faster with AI work best when you feed them a structured outline rather than a vague topic.
Your outline should also include placeholder notes for your media elements. Mark where you'll place images, charts, pull quotes, or embedded content. This prevents the common mistake of finishing a 1,500-word draft and then awkwardly trying to insert visuals as an afterthought. When media is planned structurally, it reinforces your written points instead of decorating them. Think of images and charts as structural elements with the same status as paragraphs, not extras bolted on after the fact.
Keep a running file of outline templates for your most common content types. Reusing proven structures saves significant planning time on every new post.
One practical approach is to maintain a template library. If you regularly write product reviews, how-to guides, and opinion pieces, create a reusable outline for each. Include standard sections, typical word count targets, and notes about where CTAs and media perform best. Over time, this library becomes your personal content playbook. Agencies and content teams that use AI agents for content creation often pair them with template libraries to maintain consistency across dozens of writers and hundreds of posts.
"A good outline doesn't constrain your creativity; it channels it into a structure that readers can actually follow."
Step 4: Format for Scannability and Engagement
Visual Hierarchy Tactics
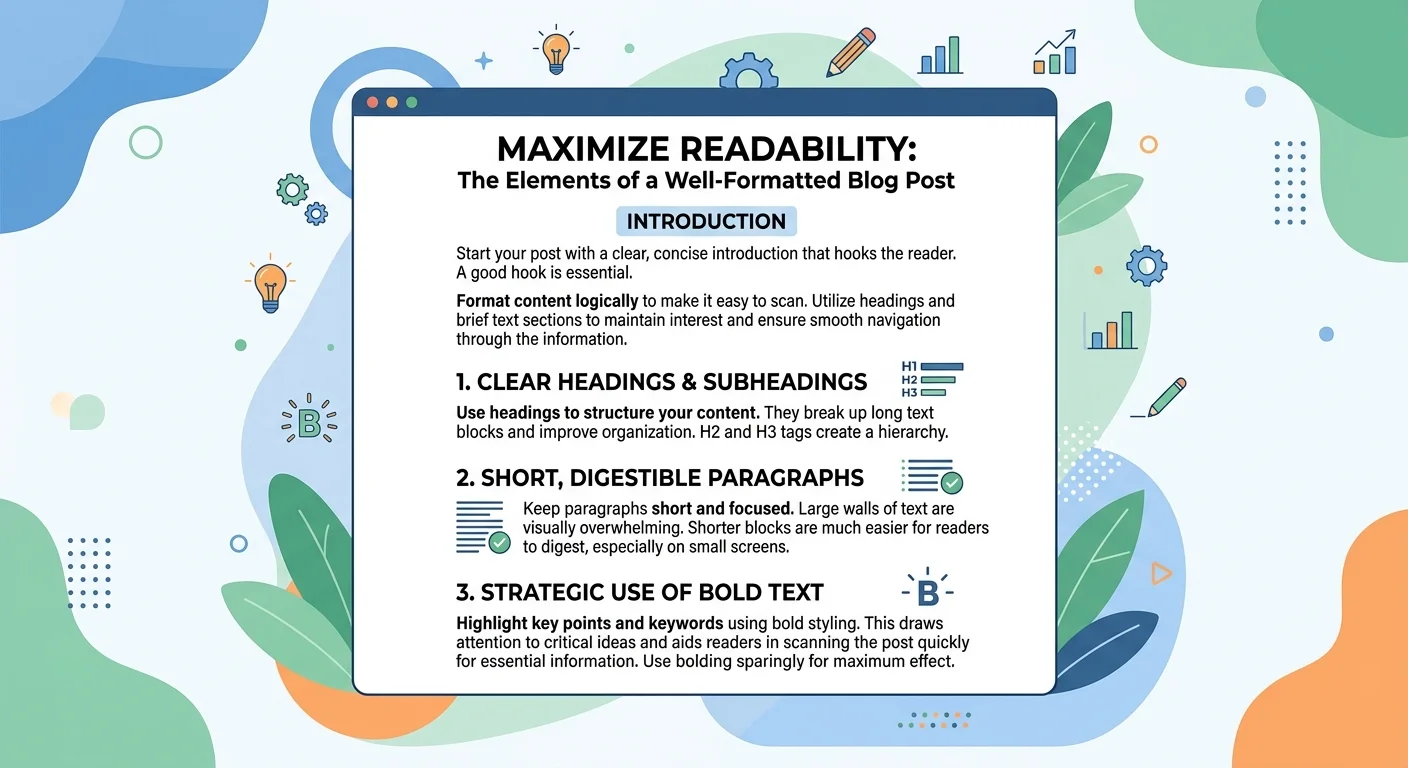
Research from the Nielsen Norman Group has shown for over two decades that web readers scan before they read. The F-shaped reading pattern means most visitors look at your headline, skim the first sentence of each section, and only read deeply if something catches their attention. Your formatting needs to accommodate this behavior, not fight against it. Using clear H2 and H3 subheadings, short paragraphs (three to four sentences maximum), and strategic bold text gives scanners entry points throughout your content.
Bullet points and numbered lists break up wall-of-text fatigue, but they should contain substantive information, not single-word fragments. Each bullet should deliver a complete thought. Similarly, bold text should highlight key terms or phrases that help a scanner understand the section's point without reading every word. Avoid bolding entire sentences, which defeats the purpose of emphasis. The goal is to create a visual hierarchy where the most important information is the most visible, regardless of how someone navigates the page.
White space is an underappreciated structural tool. Dense paragraphs signal "this will take effort" before a reader processes a single word. Breaking content into smaller visual chunks with adequate spacing between sections makes the same information feel more accessible. This isn't about dumbing things down; it's about respecting how human eyes and brains process digital content. Mobile readers, who now make up over 60 percent of web traffic, are especially sensitive to dense formatting that requires constant scrolling through unbroken text blocks.
Formatting rules differ between platforms. What looks great on a desktop blog may appear as an unreadable wall on a mobile Instagram caption or email client.
Finally, use inline visual elements like charts, tables, images, and pull quotes to create rhythm within your post. A 1,500-word article with no visual breaks feels monotonous regardless of how well it's written. Place a visual element roughly every 300 to 400 words. This doesn't mean stuffing in stock photos for the sake of it. Each element should either illustrate a point, provide data, or give the reader a moment of visual rest before the next section of text. Structural formatting is the silent partner of great writing; it determines whether your words actually get read.
Frequently Asked Questions
?How do I use the three-layer outline method before drafting?
?Does post structure change between blog articles and social media?
?How long does it actually take to outline a post before drafting?
?Is writing the introduction first a mistake even for short posts?
Final Thoughts
Post structure is the invisible framework that determines whether your content gets consumed or abandoned. The four steps outlined here, understanding core components, matching structure to platform, outlining before drafting, and formatting for scannability, apply to every type of content you'll create.
Start with the step that addresses your biggest weakness. If your drafts always run long and rambling, invest more time in outlining. If your analytics show high bounce rates, focus on formatting and hooks. Structure isn't a constraint on your creativity; it's the delivery mechanism that carries your ideas to the people who need them.
Disclaimer: Portions of this content may have been generated using AI tools to enhance clarity and brevity. While reviewed by a human, independent verification is encouraged.